
A (human) index that likes to code
Also drinks way too much coffee ![]()
ZeroTier OpenVPN NAT - Part 4
Published Feb 14, 2021 13:27
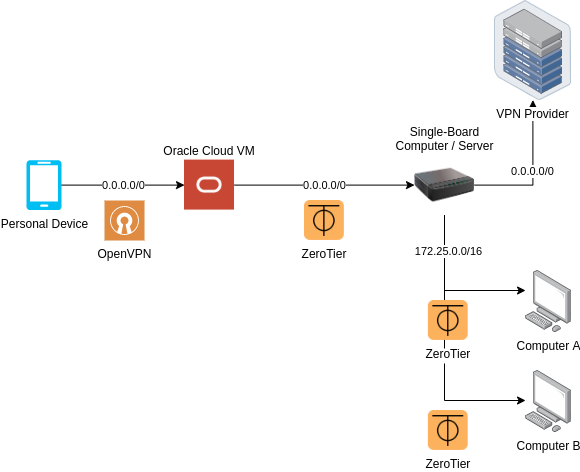
Dinosaur Architecture
Solution Dinosaur was designed to combine Solution Uno and Solution Duo; although this means inheriting both the good and bad of the two solutions, a device will have more options to stay connected to both the VPN provider and the ZeroTier network from anywhere in the world.
Step 0: Pre-requisites
You should complete the all the steps for Solution Uno, and up to Step 3 of Solution Duo. Do note that a Single Board Computer device is required, alongside the obvious need for an Oracle Cloud account.
Step 1: Create & Configure OpenVPN server
This step is quite similar to Step 4 of Solution Duo; hence, I’ll be borrowing some text from that step.
Before we can even configure the OpenVPN server, we must become a Certificate Authority and issue certificates for both the server and client. This allows clients authenticate the server, and vice-versa.
Find a suitable working folder, and create a folder to store CA related files:
make-cadir openvpn-ca
Then, append the following lines into the openvpn-ca/vars file:
export KEY_COUNTRY="US"
export KEY_EMAIL="donotemail@exdee.exdee"
export KEY_CITY="Somewhere"
export KEY_PROVINCE="There"
export KEY_ORG="CodingIndex"
export KEY_OU="ADMIN"
export KEY_NAME="server"
Change the values of all the variables to whatever you want; just try not to change KEY_NAME, unless you have to - it is easier to follow the guide if you name your key “server”.
Next, you will want to change your working directory to openvpn-ca, so that you can run the easyrsa executable with the following subcommands:
cd openvpn-ca
./easyrsa init-pki
./easyrsa build-ca
./easyrsa build-server-full server nopass
./easyrsa gen-dh
mkdir keys && openvpn --genkey --secret keys/ta.key
Easy-rsa may prompt you for additional information.
Run
easyrsa --pki-dir=<insert directory here>to change where the PKIs are stored, which by default is${PWD}/pki.
You should then create as many client certificates as the devices you plan to connect to this server. But it is not strictly necessary, as one certificate can be used for multiple devices. Here is how to create a single client certificate:
./easyrsa build-client-full client1 nopass
Copy the appropriate certificates to the /etc/openvpn folder:
sudo cp keys/ta.key ${PWD}/pki/private/server.key ${PWD}/pki/issued/server.crt ${PWD}/pki/dh.pem /etc/openvpn
Next, download the sample server configuration file from the OpenVPN’s Git repository (if you are on an Ubuntu minimal image, you should not have this on your system because it has been minimized):
cd /etc/openvpn
sudo wget https://raw.githubusercontent.com/OpenVPN/openvpn/master/sample/sample-config-files/server.conf
Edit the server configuration file; for this part, we will configure a TCP OpenVPN server listening on port 443, but the method to configure are the same for the UDP OpenVPN server listening on port 1194 if you decide to host two OpenVPN servers. Modify the following lines by searching for them in your favourite editor:
/etc/openvpn/server.conf:
port 443
proto tcp
user nobody
group nogroup
cipher AES-256-CBC
auth SHA256
push "redirect-gateway def1 bypass-dhcp"
push "dhcp-option DNS 208.67.222.222"
push "dhcp-option DNS 208.67.220.220"
dh dh.pem

# these line does not exist by default
auth SHA256
up /etc/openvpn/up-script.sh
down /etc/openvpn/down-script.sh
Create the files /etc/openvpn/up-script.sh and /etc/openvpn/down-script.sh.
/etc/openvpn/up-script.sh:
#!/bin/bash

ZT_DEVICE="ztly52mmwy"
ZT_GATEWAY="172.25.0.1"

touch /etc/iproute2/rt_tables.d/ovpn2zt.conf
echo "42069 ovpn2zt" > /etc/iproute2/rt_tables.d/ovpn2zt.conf

ip rule add from 10.8.0.0/24 table ovpn2zt
ip route add default via ${ZT_GATEWAY} dev ${ZT_DEVICE} table ovpn2zt
/etc/openvpn/down-script.sh:
#!/bin/bash

ZT_DEVICE="ztly52mmwy"
ZT_GATEWAY="172.25.0.1"

ip rule delete from 10.8.0.0/24 table ovpn2zt
ip route delete default via ${ZT_GATEWAY} dev ${ZT_DEVICE} table ovpn2zt

rm -f /etc/iproute2/rt_tables.d/ovpn2zt.conf
The CIDR, 10.8.0.0/24 is defined in /etc/openvpn/server.conf; as long as it has not been changed, the above scripts should work. Change the ZeroTier device variable to the one you noted earlier; the gateway variable should be the IP address of the host from Solution Uno. Remember to run:
sudo chmod +x /etc/openvpn/up-script.sh /etc/openvpn/down-script.sh
Try starting the OpenVPN server:
sudo systemctl start openvpn@server
sudo systemctl status openvpn@server
If the server starts successfully, enable the service:
sudo systemctl enable openvpn@server
Now that all the services are in place, allow them through the UFW:
ufw allow 9993/udp # for ZeroTier
ufw allow 443/tcp
ufw allow 1194/udp
In theory anyway. On Oracle Cloud VM instances, UFW rules are placed below a REJECT rule on the IPTables, like this:
Chain INPUT (policy DROP 0 packets, 0 bytes)
 pkts bytes target     prot opt in     out     source               destination
    4  1344 ACCEPT     all  --  tun0   any     anywhere             anywhere
 848K  472M ACCEPT     all  --  any    any     anywhere             anywhere             state RELATED,ESTABLISHED
    0     0 ACCEPT     icmp --  any    any     anywhere             anywhere
  688 59382 ACCEPT     all  --  lo     any     anywhere             anywhere
    0     0 ACCEPT     udp  --  any    any     anywhere             anywhere             udp spt:ntp
 1294 75128 ACCEPT     tcp  --  any    any     anywhere             anywhere             state NEW tcp dpt:ssh
10739 5199K REJECT     all  --  any    any     anywhere             anywhere             reject-with icmp-host-prohibited
    0     0 ufw-before-logging-input  all  --  any    any     anywhere             anywhere
    0     0 ufw-before-input  all  --  any    any     anywhere             anywhere
    0     0 ufw-after-input  all  --  any    any     anywhere             anywhere
    0     0 ufw-after-logging-input  all  --  any    any     anywhere             anywhere
    0     0 ufw-reject-input  all  --  any    any     anywhere             anywhere
    0     0 ufw-track-input  all  --  any    any     anywhere             anywhere
In other words, UFW becomes absolutely useless. As an interesting side note, trying to connect to a port other than TCP port 22 will yield ‘Destination Host Unreachable’ error messages thanks to IPTable rejecting connections with icmp-host-prohibited. There are two ways to circumvent this:
- Delete the REJECT rule;
- Add my own IPTable rules.
For this guide, I decided to just add my own iptable rules, since I don’t know the implications of deleting the REJECT rule:
/etc/iptables/rules.v4
*filter
:INPUT ACCEPT [0:0]
...
-A INPUT -p tcp --dport 443 -j ACCEPT
-A INPUT -p udp --dport 1194 -j ACCEPT
-A FORWARD -s tun0 -j ACCEPT
-A FORWARD -s zt+ -j ACCEPT
...
*nat
...
-A POSTROUTING -s 10.8.0.0/24 -o zt+ -j MASQUERADE
...
Replace zt+ with the actual ZeroTier device if you like to be less permissive.
Step 2: Create Client Configurations
This step is the same as Step 5 of Solution Duo.
Now, we generate the .ovpn files used by the clients. For convenience (and to rip off DigitalOcean’s guide), we’ll combine the CA certificate, Client certificate and Client’s key into the .ovpn file.
Firstly, we generate a working directory to store the files needed for the .ovpn file:
mkdir -p ${PWD}/client/files
Then, we download the example client configuration from the official Git repository:
wget -O ${PWD}/client/files/base.conf https://raw.githubusercontent.com/OpenVPN/openvpn/master/sample/sample-config-files/client.conf
Modify client.conf to match the server configuration (assuming TCP on 443):
${PWD}/client/client.conf:
remote x.x.x.x 443
proto tcp
user nobody
group nogroup
cipher AES-256-CBC
auth SHA256

# comment out these lines
;ca ca.crt
;cert client.crt
;key client.key
Replace x.x.x.x with the IP assigned to your Oracle VM instance.
The DigitalOcean guide uses a script to generate the .ovpn file, so that is what we will be doing too. It essentially concatenates all the necessary files together and spits out an .ovpn file.
${PWD}/client/make_config.sh:
#!/bin/bash

# First argument: Client identifier
PKI_DIR=../pki
CA_DIR=../openvpn-ca
OUTPUT_DIR=./files
BASE_CONFIG=./files/base.conf

cat ${BASE_CONFIG} \
    <(echo -e '<ca>') \
    ${PKI_DIR}/ca.crt \
    <(echo -e '</ca>\n<cert>') \
    ${PKI_DIR}/issued/${1}.crt \
    <(echo -e '</cert>\n<key>') \
    ${PKI_DIR}/private/${1}.key \
    <(echo -e '</key>\n<tls-auth>') \
    ${CA_DIR}/keys/ta.key \
    <(echo -e '</tls-auth>') \
    > ${OUTPUT_DIR}/${1}.ovpn
Adjust the directories to their absolute paths just to be sure. Once you are confident that the paths are accurate, give the script the executable go-ahead, and run the script with the parameter of the client name (should be client1, as generated with ./easyrsa build-client-full client nopass):
cd <path to client directory>
chmod +x make_config.sh
./make_config.sh client1
The .ovpn should be generated in the ./files directory. This file can then be transferred to another device, like your Android device or ISP-controlled router. Give it a spin, and ensure everything is in working order by:
- Checking IP address with ifconfig.so, or VPN provider internet checker;
- Checking ZeroTier connectivity by pinging peers in the same network.
Conclusion
Theoretically, you have set up Solution Dinosaur, which is the same set up I use personally - I may have missed out a few steps, so do your best to fill in the gaps!
Happy Coding
CodingIndex