A (human) index that likes to code
Also drinks way too much coffee ![]()
TypeSound (Developer)
Published Aug 20, 2020 04:00
This is the development commentary blog post for TypeSound, which outlines the decisions behind some of the components that make the project tick. To know more about the release of TypeSound and how to use it, refer to the previous blog post.
Unexpectedly, I had to make quite a number of decisions during this project, something I wanted to avoid doing when making a meme tool like TypeSound. The main issues are:
- Choosing the right sound library;
- Acquiring keyboard input;
- Figuring out how to adjust playback rate on the fly;
- Making the tool support future extensions; and
- Writing meaningful unit tests.
Choosing the right sound library
The whole point of writing a meme tool is to take close to zero development time, but deliver functional results. Hence, Python and JavaScript were good candidates; although I decided to go with Python given how traumatized I was with JavaScript at work. Hence, I snooped around PyPi, I saw that there exists audio packages that fulfill the not-so-well-thought-out criteria of:
- It played music.
Criteria fulfilled, we win. | Source: Giphy
When I actually got around to doing the project, I realized that I had more urgent criteria to consider:
- It still needs to play music;
- The library should be cross-platform as much as possible (i.e. not reliant on only 1 method of playback);
- But also be able to adjust playback rate on the fly.
Believe it or not, tuning the velocity at which music is projected to the ears of the listener is a much harder task than I initially thought. After all, the meme around Python was to just import the packages you need:
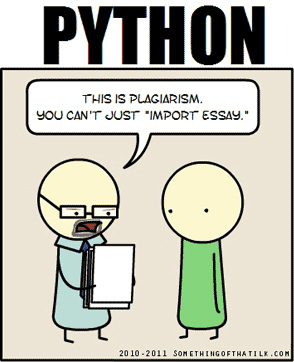
import TypeSound | Source: Reddit / somethingofthatilk.com
I searched high and low for a package that can do this natively, including:
This essentially means that I had to do the on-the-fly playback adjustment manually, either through a callback, or through inheriting a class and providing a stream manually. Hence, the competition was essentially between sounddevice and miniaudio, as they supported callbacks.
Alas, I, a container maniac, was developing TypeSound from a container. I realized that sounddevice uses the PortAudio library, which directly uses ALSA, which means it required access to /dev/snd files on my container. While I was happy to provide it, it failed the “cross-platform” requirement; I needed a library that can both use ALSA, and PulseAudio. This is a personal necessity because I still want to support the network connectivity that PulseAudio offers for another project called ContainerTop.
ALSA vs PulseAudio
The Advanced Linux Sound Architecture (ALSA) is essentially a layer on top of our sound devices, which is why playing music through ALSA would require that
/dev/sndexist in my container filesystem. With thedmixextension (information source), ALSA can mix sound from various applications and play it through a playback device, while it traditionally can only play sound from one application at a time.PulseAudio is a layer on top of ALSA, which mixes and provides network connectivity. The network connectivity part of PulseAudio allows me to create things like ContainerTop with absolutely no user mapping (a big deal for privacy & security).
Which is better? The answer is I don’t want to start a war, but I would like to support both.
Hence, only miniaudio remains. In C/C++, miniaudio is an absolute beast of a single-header library, boasting the following impressive list of backends:
- WASAPI
- DirectSound
- WinMM
- Core Audio (Apple)
- ALSA
- PulseAudio
- JACK
- sndio
- audio
- OSS
- AAudio
- OpenSL|ES
- Web Audio
sox
I know most music players out there have equalizers; they’re what behind concert-hall effects and bass-boosted audio effects you can enable in your music player. Hence, I looked for an audio manipulation library, and the best one I found was sox.
Initially, I wanted to use sox to also speed up the audio on-the-fly, but sox did not provide that functionality; I could only speed up the whole audio track before playback, which is not so ideal. Thereafter, I left sox in TypeSound for a possible future feature involving an equalizer for music playback, if I get around to doing that.
It should also be noted that miniaudio’s full set of features includes filters, which can change audio in most ways a normal equalizer can - unfortunately, at the time of writing, the python package of miniaudio did not support filters.
Acquiring keyboard input
Short of being a keylogger by a simple logging routine, TypeSound needs to know when a user has activated buttons on their keyboard to calculate the key presses per second, or KPS for short.
Sounds simple, right?
It is simple, and PyPi once again pulls through with another package: the keyboard package. Want to know the unfortunate thing?
On Linux, it requires access to /dev/input/input*, which contains the raw device files - much like how I needed to forward /dev/snd to my container for ALSA to work, I now need to forward /dev/input/input* to my container for the keyboard package to work.
Want to know another special thing that only affects me because I’m a nerd that obsessively uses containers?
You need sudo for the keyboard package to work, and I’m using a container. Container’s UID 0 and host’s UID 0 ain’t actually the same UID, and I ain’t about to make the container privileged just so my container can have access to my /dev/input/input*.
Another thing, imagine a meme tool requiring you to run sudo ./main.py, which hence requires users to install packages to site-packages so that root’s python instance can find it - it’s absolutely bonkers!
On Windows and Mac OSX, according to what I can see from the project description, it doesn’t seem to require sudo. Hence, I decided to apply abstraction to the keyboard-related dealings for this Python script, and implement both keyboard for Windows and Mac OSX computers and an X11 method using python-xlib for Linux users.
Figuring out how to adjust playback rate on the fly
The implementation of on-the-fly adjustment of the playback rate fell on me, as I had to do so in the callback function every second.
Traditionally, to increase the speed of an audio track, you would do so by re-sampling the audio, and then playing back the audio at the audio’s original sample rate. For instance, if my audio’s original sample rate is 44100, and I would like to see it played back twice as fast, I would re-sample the audio to 22050, and playback the resultant audio at 44100.
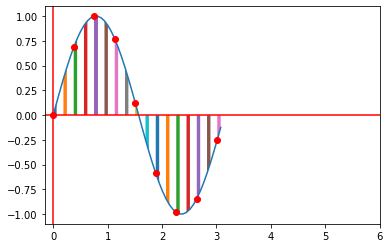
Refer to the following images. The y-axis represent the audio, while the x-axis can represent the time, both in arbitrary units. The graph as a whole represents a explanatory audio waveform. The distance between each point represent the playback sample rate, and the distance between each bar under the graph represents the audio file’s sample rate.
Before re-sampling | Source: Me
After re-sampling | Source: Me
From the images:
- The distance between each point remains the same => playback sample rate is the same
- The distance between each bar under the graph decreases by half => audio file sample rate is reduced by half
Since the playback speed is the same, and the graph is compressed horizontally, hence, the user will hear the audio played back at twice the original speed.
However, we cannot simply change any of the two available sample rates on the fly during playback. We either need to adjust the playback sample rate before restarting the playback device, or we can be true-blood engineers and find a “good enough” alternative.
Pulse-code modulation (PCM) data
During a callback, miniaudio requests a fixed number of frames (basically an array of 16-bit PCM data in our case) based on the playback sample rate. From the number of channels (i.e. width), we can obtain the total amount of PCM data to return, which is playback rate * number of channels.
For the most part, when we talk about PCM in this context, we are actually talking about Linear PCM (LPCM), which means that all the points encoded in an audio waveform is linearly related to their analog equivalents.
This is good, because this means that we can do linear piece-wise (i.e. line between every two points in an array) interpolation to obtain a representation of the audio waveform every callback, and then re-sample from that segment of the waveform to speed up / slow down the audio on demand.
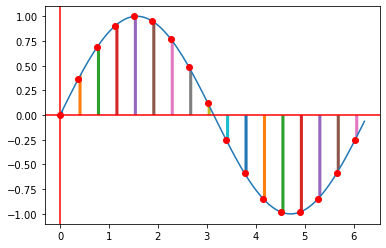
Interpolation
In a nutshell, linear piece-wise interpolation is just plotting all the points you have, and the connecting every two points with a straight line.
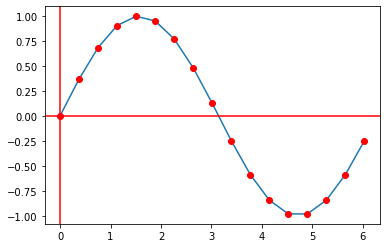
Interpolated sine-wave | Source: Me
To increase playback rate by 2, we need to re-sample the audio such that there is half as many points as there are in our original graph. The blue dots in the graph below represents the newly sampled points from our interpolated graph.
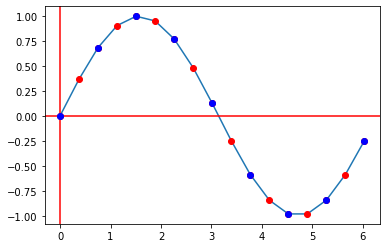
Extracting points from interpolated sine-wave | Source: Me
Practically speaking, we would also need to obtain twice as much data from the audio as per normal, as we need to return the exact number of required frames to miniaudio. In the above graphs, there are 17 red points but only 9 blue points; hence, we need another 8 blue points, which can be acquired by taking the subsequent same-sized chunk of the audio and sampling another 8 blue points from there.
In conclusion, we draw sample rate * playback rate of data from the array of original audio data, perform interpolation, then extract sample rate amount of data - this would effectively control the playback rate of our audio.
Making the tool support future extensions
If you poke around the codebase, you would see that I’ve made most of the functionality required for TypeSound accessible via interfaces. This is a plan towards making the tool extensible in the future, so that I can swap out any of the underlying packages anytime I need to; i.e. instead of using miniaudio, I can choose to use another package, or select specific implementations for certain operating systems, or change the configuration schema without breaking the previous versions of config files.
The main challenge is generalizing before I have the underlying possible implementations done - it’s easy to miss out certain required functions in abstractions if all I’m doing is designing the interface first. Fortunately, this is a small enough project where such mistakes don’t cost a lot of effort to rectify; however, I imagine this to be an issue in a large team.
It’s also relatively challenging to see the benefits of abstraction this early on in the project; hopefully I won’t have to redo major parts of the project just to benefit some from abstraction.
Writing meaningful unit tests
How exactly does one go about writing unit tests for scripts with functionality so close to its inputs (keyboard) and outputs (music playback rate)? For now, I’ve placed unit tests wherever I can, except for the config.py and main.py scripts. I would imagine testing those would qualify as functional tests since they’re using the components I’ve built as a system; moreover, the environments in GitHub runners where the tests run neither have X Servers nor sound devices to perform meaningful or conclusive tests.
So, good enough? ![]()
That ends the developer commentary for TypeSound. Honestly, I did not expect this project to take more than a weekend to complete, but I would imagine that the information I’ve learnt off the project was a good enough trade-off.
If you’ve got an Ubuntu system, do give TypeSound a try; otherwise, wait a while while I add support for Windows and Mac OSX!
Until then!
Happy coding
CodingIndex